I recently started Fire Emblem Engage for the Nintendo Switch. Engage was released on January 20, 2023. I have previously written about Engage’s immediate predecessor, Fire Emblem: Three Houses, which was released for the Switch in 2019. Three Houses inspired two full-length articles. In the first article, I made the case for writing video game strategy guides to lead players to error in order to teach them how to avoid error based on a silly mistake I had made in a late-game battle on my first run through playing on Maddening difficulty. In the second article, I discussed how I relied on the unexpected tankiness exhibited by my glass cannon mage that enabled it to survive a DLC paralogue map on Maddening that I probably tried about two chapters sooner than I should have. Today’s article brings the main idea behind these two Three Houses articles together for a short strategy guide on a useful tip for the two locked rooms toward the end of the first DLC paralogue in Fire Emblem Engage when played on Maddening difficulty if you challenge the paralogue at the first opportunity. Specifically, I explain how I defeated the two ice dragons, one in each locked room, before ever unlocking the rooms.
Unlike my first “strategy guide,” I will offer a legitimate strategy.
(Note I: Because this is a writing site and not a video game strategy guide site, I will build up to my tip in story form. However, if you are only here for the tip and not for the essay, feel free to skip ahead to information about my battle and the tip after reading my notes on scope.)
(Note II: If you are reading this article without prior knowledge of Fire Emblem, Fire Emblem is a long-running series of turn-based strategy games where you move an army around a map to achieve specific objectives. A paralogue is an optional side-story battle that becomes accessible after advancing to a certain point in the main story and/or after achieving specified prerequisites. A DLC is additional content that can be purchased to add to the base game.)
Non-spoiler notice
The only spoiler in this article is the identity of the Emblem that plays a starring role in the first DLC paralogue in Fire Emblem Engage. The article contains no other spoilers about the game’s story. Moreover, I have only played through chapter 8 as of writing this article, so I genuinely do not know what transpires beyond that. However, if you are (A) interested in the tip but (B) do not want to know anything about the paralogue before seeing the introduction, you can bookmark the article to read when you reach the chapter.
Scope of the strategy guide
The purpose of this guide is to offer one tip for dealing with the latter stages of the first DLC paralogue in Fire Emblem Engage. It is not a comprehensive guide to clearing the map, but I will note how I personally cleared it for those of you who may opt to undertake it under similar circumstances. I preface my guide with a few other notes to highlight who it may be useful to:
- I am playing on the highest difficulty level, Maddening. (For whatever it is worth, Maddening is well-balanced in Engage, at least through the first half, and I think it is easier than Maddening in Engage’s immediate predecessor, Fire Emblem Three Houses). I do not know how the map plays on Normal or Hard or what differences may exist between them and Maddening beyond overall lower difficulty levels.
- I play on Classic Mode, where death is permanent. For me, a necessary win condition is not losing any characters. If I lose a character, I either use one of the ten charges I have to go back a few turns in the battle or I restart the battle.
- I challenged the first DLC paralogue between chapters 6 and 7, when it first became available. This is significant for several reasons, including the fact that I only had one archer available (Etie). In addition to playing through the first six chapters, I had also cleared the two regular paralogues when they appeared. In my case, clearing the Mysterious Merchant paralogue which, like the DLC paralogue, appeared between chapters 6 and 7 of the main story, gave my party much-needed experience.
- Note again that this paralogue is additional content that comes with the purchase of the DLC. If you are playing Fire Emblem Engage without the DLC, you will not see the paralogue.
- I used the Edelgard Emblem, which is also part of the DLC, in the paralogue.
While my tip should work regardless of the circumstances under which you undertake the dialog, do note that I came up with the idea based on my particular circumstances.
Introducing the paralogue
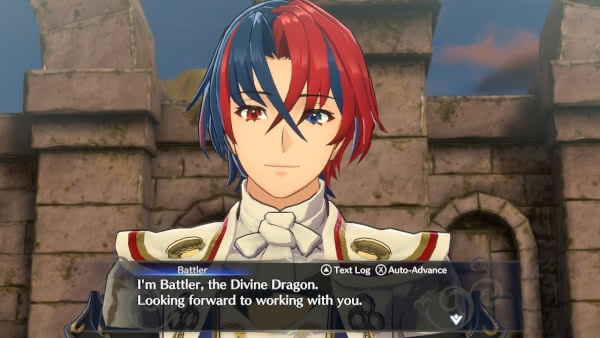
Fire Emblem Engage centers on a mechanic involving emblem rings. The game contains a number of emblem rings, each being inhabited by a hero from past Fire Emblem games. The DLC to date adds two emblem rings. Completing the first DLC paralogue is necessary for obtaining the emblem ring of Tiki, a divine dragon from earlier games who, when not in dragon form, takes the form of a girl.
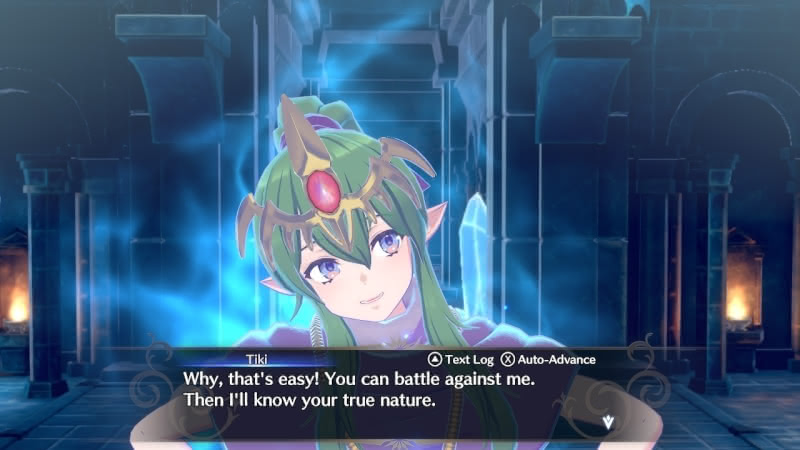
Tiki is excited to meet you, but she wants to get a feel for you and the party before joining forces. She decides that this can be best done through battle. Tiki, confident in her strength, urges the player to go all out.
Let’s see the map…
Below, you will find a picture of the full battle map on Maddening:
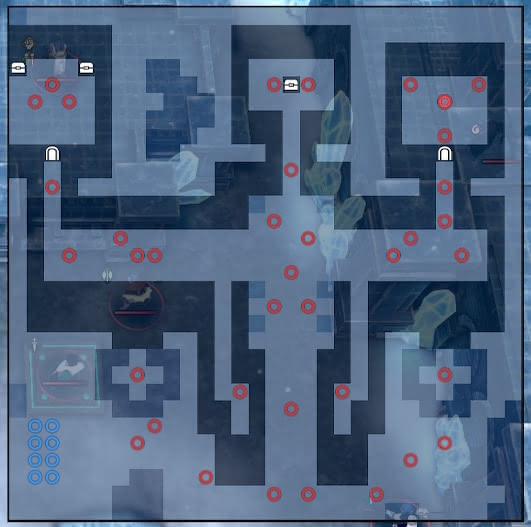
The blue dots in the bottom left are the player’s eight units. Tiki, the main objective of the map, is in a sealed chamber in the top right.

The sole objective for winning is to defeat Tiki without having the protagonist character die. That is, none of the other enemies technically need to be defeated.
I noted that Tiki is in a “sealed” room. There are two such sealed rooms – Tiki’s on the top right of the map and a second is on the top left.
There is a specific sequence to unlocking the sealed rooms. First, one of the player’s units must navigate to the center upper-most room and break a glowing seal.
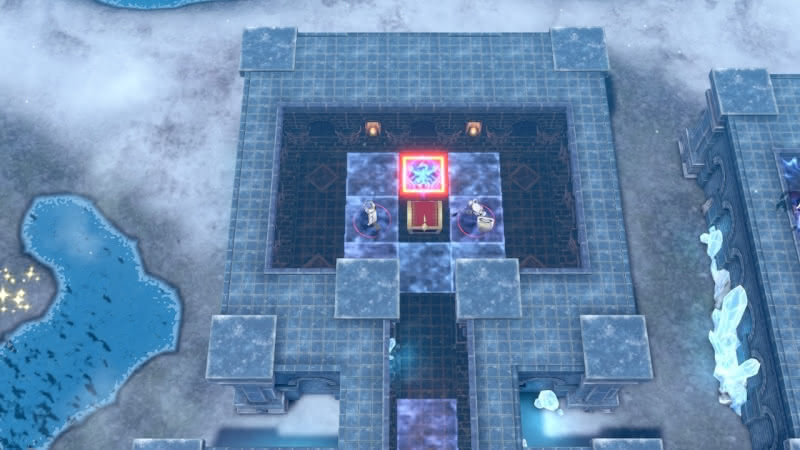
This unlocks the left sealed room (the one without Tiki). The left sealed room also has a seal. Breaking that seal unlocks Tiki’s room, allowing the player to complete the map.
The challenges of the map
Here, it is important to reiterate that I was playing on Maddening difficulty, so I cannot say for certain whether the map plays the same way on the lower Normal and Hard difficulties.
The first notable thing about the map is that it is quite large by Fire Emblem standards. The small diagram does not fully capture how big it is. Another issue, depending on how you play, is that the inside of the castle has narrow passageways. On one hand, this keeps enemies somewhat close together. On the other hand, it can make it difficult to keep more fragile units out of harm’s way.
The big challenge does not show up on the initial diagram. Regardless of what the player does, reinforcement units start appearing at the foot of the castle entrance (bottom-center of the map in turn 13 or 14). The reinforcement units always consist of two flying dragons with an obnoxious and high-damage ranged frost-breath attack and two randomly-selected normal units (the cavalry units are the worst). Now it would be one thing if this only happened a few times. But the game sends 10 rounds of reinforcement units, finally ceasing around turn 34 or 35. The final round consists of only three dragons instead of two dragons plus two other units. Note that the reinforcements will arrive every 2-3 turns regardless of whether you cleared the previous round.
One thing to understand about Fire Emblem is that, in general, normal enemies have a tendency to sit and wait unless you enter their attack range. Because of this behavior, difficult maps are often manageable by dealing with individual groups of enemies while not triggering others until you are ready. In one of my early failed attempts, I had the genius idea of trying to clear the main hallway of the castle and then dealing with reinforcements before taking the wings of the castle. However, I discovered that somewhere around the 3rd-5th reinforcement waves, the enemies on the right wing of the castle begin advancing toward the entrance regardless of whether you have moved within range. One can see the pincer issue that caused me to abandon this strategy.
I faced a challenge particular to tackling this paralogue as soon as it became available. The biggest problem units on the map are the winged dragons. These dragons fly. Any Fire Emblem veteran will be aware that flying units do not like archers. These dragons, like other fliers, are particularly weak to archers. However, in chapter 6, you will only have one archer unit available in the person of Etie. Etie is a power archer meaning that, with a good bow, she should be able to one-shot eliminate individual dragon units and there is an opportunity to pick up a longbow, which has enough range to keep Etie out of harms way (albeit she may not be able to one-hit KO with it) while attacking. However, there are two issues. Firstly, you may recall that I noted that all of the reinforcement rounds come with two dragon units. Conversely, Etie is only one unit. Secondly, Etie has some draw backs as a unit. She is relatively fragile on Maddening level and she has low speed. In my case, she could not survive a Dragon unit attacking her and there are other units on the map capable of killing her in one turn if allowed to initiate combat against her.
The final issue is Tiki herself. After Tiki’s room is unlocked, she unsurprisingly transforms into a dragon. She is accompanied by three dragon units in the chamber. Dragon Tiki gives the dragon in front of her an extra life, meaning that it survives being killed once. Moreover, Tiki can give the dragon an extra life-bar a second time provided that it loses it in one turn but is not eliminated (note that this is the issue I discovered an end-around for). Note that I did not get a real chance to fight Tiki herself until my final victory run, so I was a bit unsure of her attacking strength.
My failed runs
The first time I tried the map, things went well until the third-or-so round of reinforcements arrived, at which time my small army was overrun and I decided that it would be best to try a different set-up. On my second attempt, I cleared both northern wings of the castle and unlocked Tiki’s room. However, I had not made it past the point where reinforcements stopped, and I was backed into a losing position in the northwest wing before getting to Tiki (I would estimate I still had 3-4 reinforcement rounds to boot). On a third attempt, I tried waiting out the reinforcement rounds before dealing with the castle – only to learn that the northeast castle enemies will move on their own at a certain point.
My problems at the time I took the chapter were threefold. Firstly, I had difficulty with my units at the levels when they were doing enough damage to get rid of reinforcement rounds in a single turn. One-turn wins were crucial because I had a number of units, one being Etie, who could not survive being attacked by the wrong unit (some of my bulkier ones could only survive one round). Finally, there were a couple of instances when I needed to have too many of my characters engage with their Emblems at the same time, leaving me vulnerable when I had another obnoxious round of enemies and my engage meters had not recharged.
Modifying my approach
While the paralogue was difficult, I was convinced that it was not impossible after I checked to confirm that the waves of reinforcements were not endless. I just needed a bit more resources than what I had and the correct approach. In addition to the fact that I wanted to beat the paralogue before undertaking chapter 7, I learned through a quick search that the level of the enemies scales with your in-game progress, so some of the benefits of waiting would have been rendered nugatory by higher enemy levels (albeit were I to receive a second archer, waiting would still be a net benefit to me).
I had a regular paralogue battle available to me separate from the next story chapter. I completed the regular paralogue (quite a bit easier than Tiki’s paralogue) with much of the party that I planned to bring to fight Tiki. Some of my units gained levels, and I acquired a master seal which allows one to move a unit that has reached level 10 from a regular class to an advanced class. At the moment, I only had one unit at level 10. This unit, Celine, was an important part of my strategy against Tiki and I planned on using her for the foreseeable future, so I used my first Master Seal to promote her to her canonical advanced class.
I aborted my first new Tiki paralogue attempt early because the way I set up two of my characters did not give me the damage output that I needed. This led to my final adjustment and my eventual victory.
My final party and early battle
My winning team was as follows (everyone was in their base class except for Celine, who was in her advanced Vidame class):
- Protagonist + Emblem Edelgard
- Alfred + Emblem Siguard
- Celine + Emblem Celica
- Chloe
- Clamme + Emblem Micaiah
- Etie
- Framme
- Vander + Emblem Marth
Let us walk through my thinking:
Protagonist and Emblem Edelgard was (and is) my strongest character. I had forged his special sword to level four and engraved it with Marth’s emblem. He could not quite one-shot the dragons, but he came close enough to allow another character to finish the job in one turn. I gave him Edelgard, a DLC emblem, because one of its engage moves uses a bow which unsurprisingly can one-hit KO a dragon.
Alfred is a lance-based cavalry unit with solid physical defense. I brought him because he struck a good balance of being able to do some meaningful damage while not being susceptible to one-hit KOs on the physical side. I paired him with Sigurd in order to give him some extra strength and mobility.
Celine and Emblem Celica gained the ability to use healing staves with her promotion to Vidame, giving me two healers for the map. Her magic stat was good enough to deal with armored units that had low magic resistance, especially with a boost from pairing her with Emblem Celica.
Clamme and Emblem Micaiah was my main magic unit along with Celine. Pairing him with Micaiah gave him the ability to use healing staves, which gave me three healers. Clanne had his moments but I had to protect him due to his low bulk.
Chloe is the only flying unit available at this point in the game. I had originally paired her with Micaiah so she could gain access to healing staves, but that rendered her unable to do meaningful damage. As she was, she did well enough to help deal with magic-wielding enemies while otherwise doing chip damage or staying out of harm’s way.
Etie was my MVP of the battle. She could one-hit KO dragons with her +1 Steel Bow and came close to doing so with her +1 Longbow, the latter of which kept her from being counter-attacked.
Framme: Framme is almost incapable of doing damage in level 6, but she can naturally use staves and has a unique skill from her class which was essential to the strategy I wrote this article to explain. Specifically, so long as Framme is at full health, she can guard an adjacent unit from one attack at the cost of a small amount of damage to herself.
Vander and Emblem Marth is the designated pre-promoted class in Fire Emblem Engage. I brought him because I wanted at least three characters who could reliably take a hit or two for me. Vander’s only weapon in his default class is an axe he has some accuracy issues. A few of the turn rewinds I had to use came on account of Vander missing when he had about 70% chance of hitting. However, he also soaked up some attacks for me and I needed his engages with Marth on a few occasions to clear enemy hordes.
I have read that some people used Yunaka, a Thief unit with high speed, as a “dodge tank” on the map, taking advantage of its evasion tiles. I did not have a great dodge set-up for Yunaka, and found when I used her that she was largely unable to deal the kind of damage that I was looking for or dodge hits consistently. I also brought Boucheron on a few occasions to try to take advantage of his ability to deal extra damage when another unit attacked an enemy within his own attack range. He worked decently well and I could have perhaps used him in lieu of Clanne, but I decided that having three healers was more valuable. I also considered Louis, my only armored unit. Louis was and is one of my better units, but I had two issues with him. Firstly, he took quite a bit of damage from the dragons despite his defense stat. Secondly, whenever mage units appeared, I had to protect Louis because of his very low magic resistance. These factors led me to prefer Vander as a physical tank for the battle over Louis.
Early battle
I was able to make my way into the castle and clear out the main hall about 3-4 turns before the first reinforcements arrived. Having learned my lesson from a previous run, I then cleared the right wing of the hall in between the second and third round of reinforcements before clearing the left wing. I needed to rewind time on a few occasions when I misjudged the range of cavalry reinforcements and when Vander missed an attack that I needed him to hit, but after defeating the last round of reinforcements, I still had four rewinds remaining for the final three rooms. One thing that I learned in the battle was that I had the most success taking the initiative and trying to aggressively clear reinforcements while moving forward, something I was able to do except for two-to-three rounds when they reached me as I was clearing one of the two northern wings of the castle. I tended to have more difficulty when I allowed the reinforcements to advance into the castle more than once.
Before continuing, I note that it is fully possible to defeat Tiki relatively early in the map while reinforcements are still coming. I will venture that this is readily doable on lower difficulties or for those who challenge the paralogue later in the game with stronger units. However, in my case, my units were not strong enough to deal with Tiki while having reinforcement dragons breathing down their necks, so I opted to deal with the reinforcements entirely before breaking the seals and proceeding to the final showdown.
My strategy on the sealed rooms
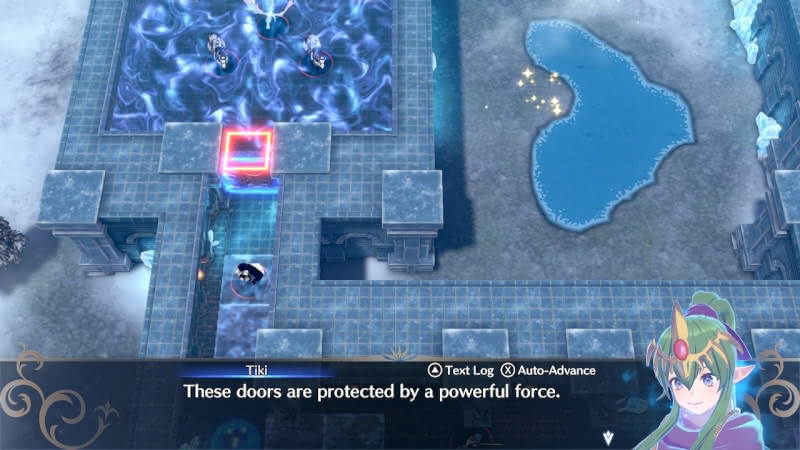
It is impossible to initiate an attack into the two sealed rooms in the northwest and northeast of the map without opening the doors. For example, when engaged with Emblem Celica, a player can warp to a different square on the map and attack in one turn. Out of curiosity, I checked to see whether one could warp into a sealed room and attack. No dice. Moreover, although Etie could technically get in range of the two dragons close to the sealed room doors, she could not initiate an attack.
However, speaking of Etie, I noticed something interesting about the sealed room doors. If you click on an enemy in Fire Emblem Engage, you can see its attack range. See the northwest dragon here.

Note its attack range extends two tiles beyond the sealed door. Note that both sealed rooms have a dragon with the same attack range outside the door. See Tiki’s below.
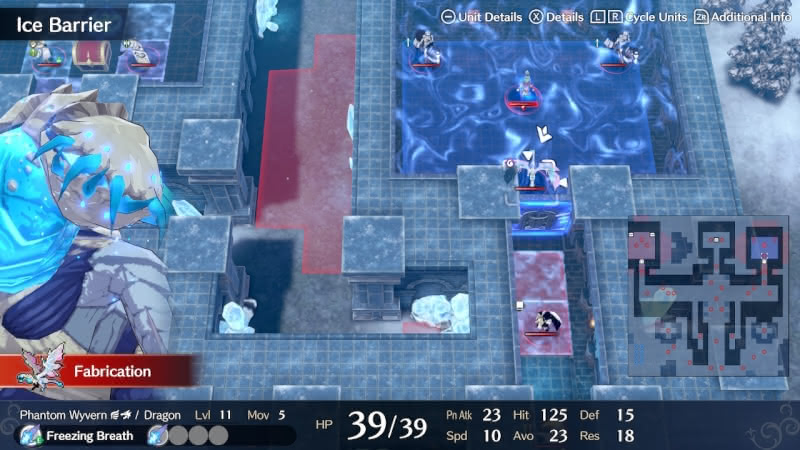
This gave me an idea. What if I positioned Etie to make the dragon attack? So long as she had a longbow equipped, she should in theory be able to counter-attack. I did have one issue – I noted earlier that if one of the dragons initiated against Etie, it would kill her in one turn because the dragon was fast enough to “double” Etie, and our archer could only survive one attack. However, there was a way around this.
Framme, my main healer, was in the Martial Monk class. This allowed Framme, so long as she was at full health, to protect an adjacent ally from damage at the cost of four damage to herself. In the case of protecting Etie, this led to the following sequence (I used it a few times against regular dragons):
- Dragon attacks Etie
- Framme blocks first attack, taking four damage for Etie
- Etie counter-attacks with longbow
- Dragon’s second attack hits Etie but, as I noted, Etie could survive one attack
I decided to see if I could use a strategy to deal with the two dragons near the sealed doors. Here was my theory:
- Give Etie a longbow and position her at the very edge of the dragon’s attack range while the door is still sealed
- Position Framme at full health next to Etie so she can use her guard skill to protect Etie from the first of the dragon’s two attacks
- Position Celine or Cramme next to Framme so one of them could heal Framme back to full health
With this set-up, the following should occur:
- First turn: Dragon attacks Etie. Framme takes four damage protecting Etie from the first attack, Etie counter-attacks, doing significant damage to dragon, Dragon’s second attack hits Etie, doing significant damage to her.
- In between turns, Celine/Cramme uses healing staff to heal Framme. Framme uses guard. Having Etie use a healing item to heal herself is optional. It serves as a hedge in the event that her counter attack misses, which would lead to a fatal attack from the dragon. However, I will note that I did not miss once with Etie in the entire paralogue.
- Same process repeats. Framme blocks dragon’s first attack against Etie, Etie’s counter-attack eliminates the dragon due to its being at low health after the first.
I was not entirely sure that this would work due to the fact that I could not have Etie actually attack the dragon from outside the door. Would she be able to counter? Would the dragon even attack with the door closed? I was not particularly concerned about the northwest room regardless, but I was concerned about the dragon in Tiki’s room due to my knowing that Tiki would give it an extra life bar. If I could eliminate that dragon before Tiki could act, my life would be much easier. I decided to test my theory on the northwest room before unlocking it to see if it would work.
To my great fortune, my theory was correct. The dragon attacked Etie when she moved to the edge of its range, and despite the fact that Etie could not initiate an attack from outside the door, she could counter-attack when the dragon attacked her. This allowed me to eliminate the northwest dragon before breaking the middle seal to open the door and clear the room. Because I knew this worked, I repeated the process with the Tiki’s northeast room. Before breaking the seal to unlock the door, I used the Etie, Framme, Celine trio to eliminate the dragon. Engaging the dragon did not cause Tiki to react at all. After moving my characters (I wanted to engage Tiki in a larger hallway), I unlocked the door. Since there was no dragon, Tiki did not have anything to give an extra life bar too. I can say with confidence that this made my brief battle with Tiki and the two cavalry units flanking her quite a bit easier by allowing me to concentrate my fire-power without worrying about an extra dragon that I would have to kill twice in one turn.
In order to execute this strategy, you will need to make sure you acquire the lone longbow in an earlier chapter to give to Etie, bring Framme or Jean to the battle (Jean is the only other available character with the guard skill as of the end of chapter 6), and have someone positioned to heal Framme or Jean so they can protect Etie from the second attack. Finally, on Maddening, you will need to make sure that Etie can survive one attack from the dragon. I am not sure what the minimum requisite level will generally be, but I will note that she does not take the dragon attacks particularly well even at level 10. I will estimate that she needs to be at least at level 6, but I did not test her at every level to see how much damage she was taking. In theory, you can give Etie a little bit of extra defense by raising her bond rank with Emblem Edelgard, but I did not do that before tacking the paralogue.
Conclusion
Tiki herself was not difficult to handle. I used Chloe with Emblem Sigurd to eliminate the two cavalry units with Tiki, and I was happy to discover that Tiki only has one attack range. This allowed me to use my three most physically durable units – protagonist, Vander, and Alfred – to pin Tiki, thus protecting everyone else while making it easy for my healers to heal off any damage to the three defensive units. Moreover, I could use Framme to protect two of the three pinning units from damage so long as she was at full health. With that, my long nightmare was over with three of my ten original rewinds to spare. The game selected Etie as the MVP of the map based on the number of units she killed. While her effort was not quite as remarkable as what my unexpectedly tanky glass cannon mage, Lysithea, managed in a DLC paralogue in the previous entry in the series, Fire Emblem Three Houses, Etie, who gained four levels in the paralogue, was the worthy MVP.
For whatever it is worth, I note that Tiki is a monstrously strong Emblem, especially when paired with the protagonist. If you have purchased the DLC and are planning to take advantage of that nice DLC content, I recommend completing Tiki’s paralogue as soon as possible so you can benefit from all that comes with pairing with Tiki to turn into an indestructable dragon for several turns (not to mention you would have spent $30 for the privilege). It is very satisfying.